
Introduction
Fitbit devices come with a lot of great features and functionality installed, most of which is fairly intuitive. However, one thing that’s not straightforward about your Fitbit device is how to change the time. I’ll show you how to do that through the Fitbit app for iPhone or iPad.
Some of the images associated with the steps are included inline below. All images associated with these steps can be seen in the embedded YouTube video. Also, please note that you’re not able to leave a comment directly on this article. If you have a question or feedback, please leave it on the YouTube video.

Steps to Change Time on Fitbit Using iPhone or iPad
- Launch the Fitbit app on your iPhone or iPad device. You’ll land on the Fitbit Today screen.
- Tap your profile picture in the upper left corner of the screen. The Account screen is displayed.
- Scroll down to the Settings section, and then tap “Advanced Settings” in that section. The Advanced screen appears.

- Tap the toggle to the right of Set Automatically in the Time Zone section to turn it off. This will make it possible for you to change the associated time zone in the section below.

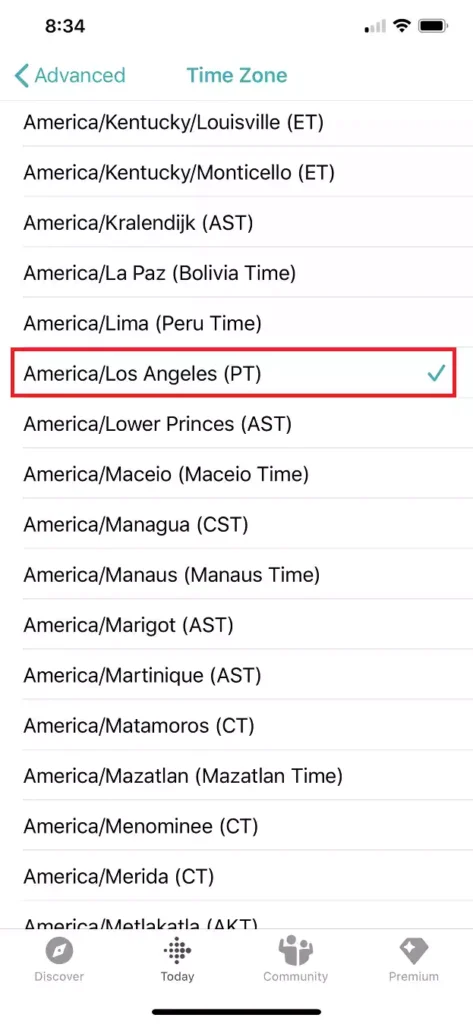
- Tap “Time Zone.” The Time Zone screen is displayed, showing a list of all available time zones.

- Tap to select the time zone you want to use. A check mark will appear to the right of that time zone. Tap the “Back” button in the upper left corner of the screen to go back to the Advanced screen, where you’ll now see your new time zone displayed to the right of Time Zone.
- Tap the “Back” button in the upper left corner again to return to the Account screen, and then tap the name of your Fitbit device you want to change the time on. The information screen for that device will be displayed.

- Scroll down and then tap “Sync Now” in the menu. Your Fitbit device will be synced with your account, and the time on your Fitbit device will be automatically changed.
